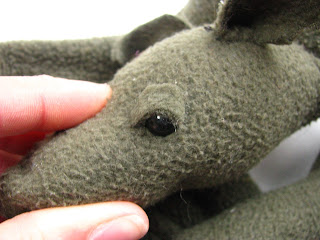
I realized very quickly that hand embroidering eyes was not my strong point, it took (and still takes) me forever to get the perfect eye. I decided to plastic eyes and it was a great fit, but something wasn't quite right, they lacked that little extra bit of personality. The sleepy eyelid was the solution and it took quite a bit of trial and error to get it just right, but we'll skip that part and show you what I do now.
This is Norbert, he's my Lil's best buddy and I am charged with fixing him while she's at camp. Her little brother decided he was in a destructive mood and peeled off his eyelids.
Next to Norbert is an Elmer's "Craft Bond, Extra Strength" glue stick. You need to use this or the "Extreme" glue stick because they will create a strong wash resistant bond, normal glue will just wash away. I also prefer a stick to a liquid glue because it has very little to any mess.

I like to use my thumb to measure the eyelid, just cut around it does not need to be perfect.

Check the sizing before you add the glue, as you can this eyelid is a little to big. Trim away the extra, but make sure you don't trim to much. It's better to have a little to much then not enough.
Get that glue on to the back of the eyelid.
Place on your creatures eye.
Smooth the eyelid out over the curve of the eye, be sure you get it all the way back so the fabric connects. If you have sewn on or button eyes you can tuck it behind. While the glue is still new move the eyelid around until it get an expression you like.
There you have it some personality packed sleepy eyelids!
I hope you found this helpful. Come back for more tips and tricks, along with some peeks inside the creative chaos I call home.
Thank You
Naomi


Great tip! I wondered how you did the eyes!
ReplyDelete